

Mushroom Contamination: Types, Signs & How to Avoid It
Contamination is the most common reason mushroom cultivation fails. Whether you are working with liquid cultures, grain spawn, agar plates, or bulk substrate, understanding contamination is essential for consistent results.
This guide explains:
- The most common types of contamination
- How to identify them visually
- How to prevent contamination in each stage of cultivation
What Is Contamination?
In mushroom cultivation, contamination means unwanted microorganisms (molds, bacteria, wild yeasts) competing with your mushroom mycelium.
Contaminants:
- Grow faster than mushroom mycelium
- Consume nutrients
- Produce toxins
- Cause failed colonization
Healthy mushroom mycelium should be white (most species), clean, and consistent.
Common Types of Contamination
1) Trichoderma (Green Mold)
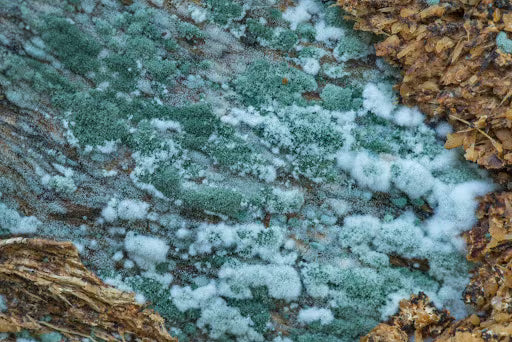

Appearance:
- Starts as white fluffy growth
- Turns bright green when sporulating
- Often appears in patches
Why it happens:
- Poor sterilization
- Contaminated inoculation
- Dirty workspace
Important: Once green spores appear, the culture must be discarded immediately.
2) Bacterial Contamination (“Wet Spot”)

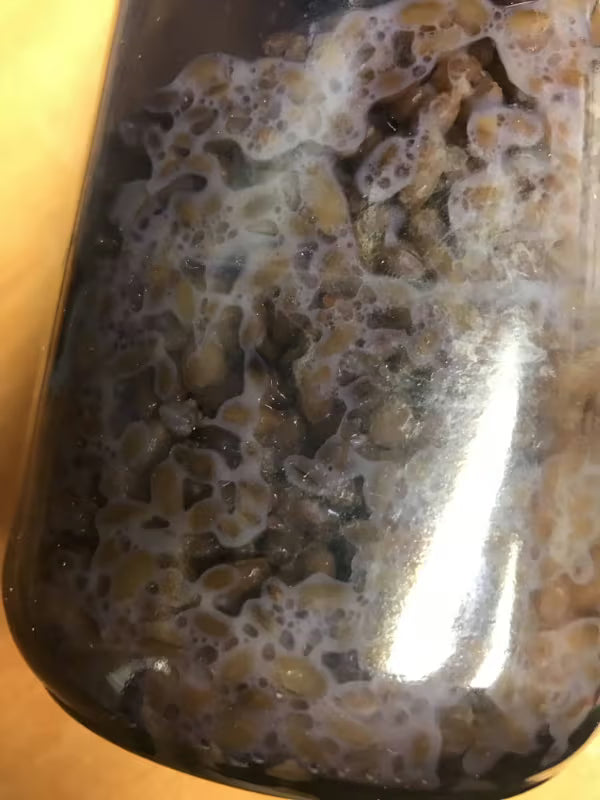
Appearance:
- Wet, slimy grain
- Sour or sweet unpleasant smell
- Mycelium looks thin, weak, or overly shiny
Why it happens:
- Too much moisture in grain
- Insufficient sterilization
- Weak or stressed culture
Bacteria often do not show strong color changes — smell is a key indicator.
3) Black Mold (Aspergillus / Rhizopus)
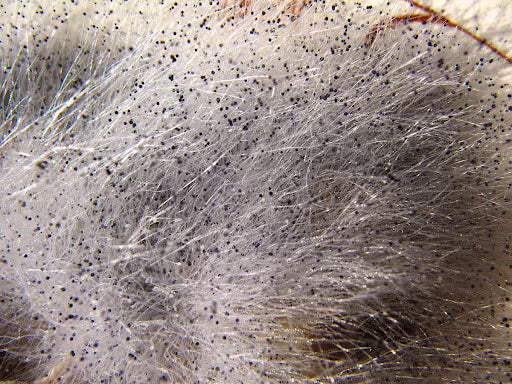

Appearance:
- Black or dark gray powdery spots
- Rapid spread
- Dust-like spores
This type spreads aggressively and should never be opened indoors.
4) Yeast Contamination

Appearance:
- Creamy, smooth texture
- May look like melted butter
- Often yellowish or beige
Usually occurs when sterile technique is weak during transfer.
How to Prevent Contamination
Prevention is 80% of successful cultivation.
1.Use Proper Sterilization
- Grain: 121°C (15 PSI) for 90–120 minutes
- Agar: 20–30 minutes at 121°C
- Liquid culture: 20–30 minutes at 121°C
Never rush sterilization.
2. Control Your Workspace
Best practice:
- Work in front of a laminar flow hood
- Or use a properly prepared still air box
- Disinfect surfaces with 70% alcohol
- Minimize airflow in the room
Sterility during transfer is crucial.
3. Avoid Overhydration
Too much water = bacterial paradise.
Correct grain preparation:
- Fully hydrated
- Surface dry before sterilization
- No pooling water inside jars
4. Use Clean, Proven Cultures
Contamination often begins with:
- Old liquid culture
- Unverified clones
- Improper storage
Signs of a healthy liquid culture:
- Clear solution
- No cloudiness
- Visible mycelial strands
5. Practice Proper Technique
- Flame sterilize needles before each injection
- Do not open jars unnecessarily
- Avoid talking/breathing directly over sterile material
- Work calmly and efficiently
Most contamination comes from rushed movements.
4. When to Discard a Culture
Discard immediately if you see:
- Green spores
- Black powder
- Strong sour smell
- Thick slimy grain
- Rapid non-white growth
Never try to “save” a contaminated grain jar.
Advanced Prevention Strategy
If you want to dramatically reduce contamination rates:
- Start cultures on agar first
- Transfer only clean sectors
- Use laminar airflow
- Test liquid cultures before mass production
- Keep a clean master culture bank
Professional growers rely on process control, not luck.
Final Thoughts
Contamination is not failure — it is part of learning sterile technique.
Even experienced cultivators occasionally lose batches. What separates success from frustration is:
- Controlled environment
- Proper sterilization
- Clean technique
- Patience
With consistent process discipline, contamination rates can drop below 5%.


